Tired of your 4K movies on Xbox looking less than stellar? You've invested in the latest console and a beautiful TV, only to find that blockbusters feel a bit… flat? It's a common frustration, but with the right tweaks, you can unlock a truly cinematic experience. This guide is all about Optimizing Xbox and TV Settings for Enhanced 4K Movie Playback, turning your living room into a premium home theater without needing a degree in AV engineering.
Getting the most out of your 4K movie collection on an Xbox isn't just about plugging things in. It's about fine-tuning the subtle interplay between your console and your television. We'll walk through the essential adjustments, demystifying jargon and empowering you to enjoy every pixel and every nuanced shade exactly as the filmmakers intended.
At a Glance: Your Quick Path to Perfect 4K Movies
- HDMI 2.0+ Cables Are Essential: Old cables can bottleneck your signal. Ensure you're using High-Speed HDMI cables.
- Connect to the Right TV Port: Your TV likely has specific HDMI 2.0 or 2.1 ports for full 4K/HDR support. Check your TV manual!
- Enable Full HDMI UHD Color/Enhanced Mode: This setting on your TV unlocks wider color gamut and HDR.
- Calibrate Xbox Display Settings: Use the Xbox's built-in 4K TV details and calibration tools.
- Choose "Movie" or "Cinema" Mode on Your TV: These picture modes are usually the most accurate for film content.
- Turn Off Motion Smoothing: Your TV's "soap opera effect" (motion interpolation) is typically bad for movies.
- Adjust Backlight/OLED Pixel Light: Set this based on your room's ambient light for optimal contrast.
- Prioritize Accuracy Over Punchiness: Resist the urge to max out sharpness or dynamic contrast for the best cinematic feel.
The Foundation: Is Your Setup Ready for True 4K?
Before diving into menus, let's confirm your hardware can even do 4K and HDR properly. Think of it as ensuring your car has gas and oil before hitting the highway.
Your Xbox: A 4K Movie Powerhouse?
Modern Xbox consoles—specifically the Xbox One S, Xbox One X, Xbox Series S, and Xbox Series X—are all capable of playing 4K Blu-rays and streaming 4K content. However, there are nuances. The Xbox Series S, for instance, upscales games to 4K but natively supports 4K media playback. The Xbox Series X and One X render games in native 4K.
Regardless of your model, for movie playback, they all handle 4K resolution with HDR (High Dynamic Range) capabilities. If you're curious about the specifics, you can always Explore Xbox 4K movie capabilities in more detail.
Your TV: The Canvas for Your Cinematic Masterpiece
Not all 4K TVs are created equal. To get the full experience, your TV needs to support:
- 4K Resolution (3840 x 2160 pixels): This is the baseline.
- HDR10 (High Dynamic Range): The most common HDR format, supported by all Xbox consoles.
- Dolby Vision (Optional but Recommended): A more advanced, dynamic HDR format supported by Xbox Series X|S and many 4K TVs.
- HDMI 2.0 or 2.1 Ports: Crucial for bandwidth. HDMI 2.0 is sufficient for 4K at 60Hz with HDR, while HDMI 2.1 adds support for higher refresh rates and other advanced features, though for pure movie playback, HDMI 2.0 is often enough.
Quick Check: Look at your TV's ports. Some manufacturers label their enhanced ports (e.g., "HDMI 1 (4K HDR)" or "UHD Color"). Consult your TV's manual to identify the best port for your Xbox.
HDMI Cables: Don't Skimp on the Lifeline
This is often overlooked, but cheap or old HDMI cables can be the weak link. For 4K and HDR, you need "High-Speed HDMI" cables, sometimes labeled "Premium High-Speed" or "Ultra High-Speed" for HDMI 2.1. These cables are designed to handle the higher bandwidth required for 4K video, wide color gamut, and HDR metadata. If you're experiencing flickering, dropouts, or a lack of 4K/HDR options, your cable is a prime suspect.
Configuring Your Xbox for Pristine 4K Movies
With the groundwork laid, let's dive into the Xbox settings menu. This is where you tell your console exactly how to output video to your TV.
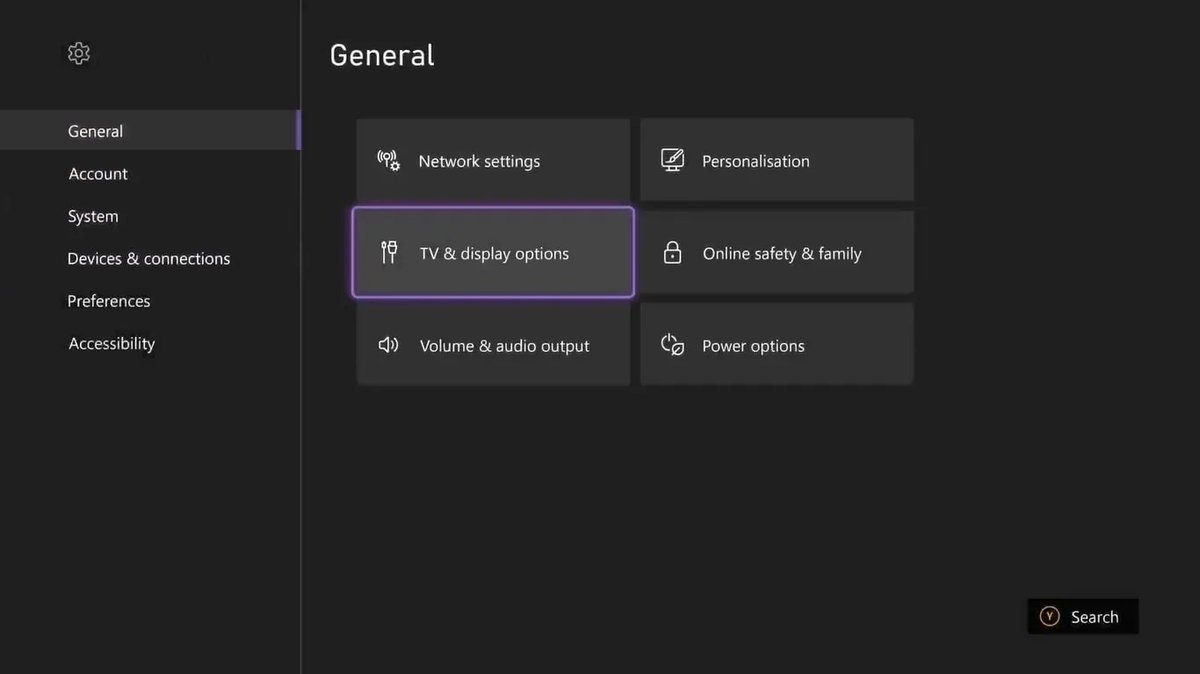
Navigating to Display & TV Options
- Press the Xbox button on your controller to open the guide.
- Go to Profile & system > Settings.
- Select General > TV & display options.
Step 1: Confirming Your 4K & HDR Capabilities
Under "TV & display options," you'll find 4K TV details. Select this. The Xbox will run a quick check and show you a comprehensive list of what your TV supports. You want to see green checkmarks for:
- "Your TV supports 4K UHD (60Hz)"
- "Your TV supports HDR10 for gaming and apps"
- "Your TV supports Dolby Vision for gaming and apps" (if applicable)
- "Your TV supports 4K 10-bit at 24Hz" (crucial for movie playback)
- "Your TV supports 4K 10-bit at 50Hz"
- "Your TV supports 4K 10-bit at 60Hz"
If anything here is a red "X," it indicates a problem with your cable, TV port, or a setting on your TV (which we'll address next).
Step 2: Setting the Resolution and Refresh Rate
Back in "TV & display options":
- Resolution: Set this to 4K UHD.
- Refresh rate: For movie playback, 60Hz is standard for the console output, but your TV will adapt to the movie's native frame rate (e.g., 24p for films). Some setups benefit from setting the refresh rate to 24Hz directly if your TV handles it well, but 60Hz is generally fine for automatic detection.
Step 3: Video Fidelity & Overscan
This is where color space and depth are configured.
- Display: Auto-detect (Recommended)
- Why: This lets your Xbox determine the optimal signal based on your TV. Manually setting it can sometimes cause issues.
- Color depth: 10-bit (if supported).
- Why: 10-bit color offers millions more colors than 8-bit, reducing color banding and providing smoother gradients, essential for rich HDR visuals. Only select this if your 4K TV details confirm 10-bit support.
- Color space: Standard (Recommended).
- Why: This typically refers to the Rec. 709 color space for SDR and Rec. 2020 for HDR. "PC RGB" is primarily for monitors and can sometimes lead to crushing blacks or clipping whites on a TV.
- Apps can add a border: Uncheck this. Modern TVs shouldn't need overscan; unchecking it ensures you see the full picture.
Step 4: Video Modes for Cinematic Precision
Under "Video modes," ensure the following are checked:
- Allow 4K: Absolutely essential.
- Allow HDR10: Enables HDR for all content supporting it.
- Allow Dolby Vision: If your TV supports it and you prefer it over HDR10 (many premium streaming apps use it).
- Allow YCC 4:2:2: This enables a specific color sampling format that helps with bandwidth for 4K HDR signals without visible quality loss. It's often recommended.
- Allow 24Hz: Crucial for smooth movie playback, preventing "judder" (the slight stuttering motion associated with displaying 24 frames per second content on a 60Hz display without proper frame rate conversion).
- Allow Variable Refresh Rate (VRR): While primarily for gaming, it won't hurt movie playback.
- Allow Auto Low-Latency Mode (ALLM): Also primarily for gaming, but harmless for movies.
A Note on Dolby Vision: If your TV supports Dolby Vision and you enable it on the Xbox, content that supports Dolby Vision will automatically switch to that format. For everything else, it defaults to HDR10. Experiment to see which you prefer for movies; some prefer Dolby Vision for its dynamic metadata.
Step 5: Calibrating Your Display
Xbox offers a built-in calibration tool. While it's more geared toward gaming, it can help establish a baseline for brightness and contrast.
- In "TV & display options," select Calibrate TV.
- Follow the on-screen prompts for basic brightness, contrast, and sharpness adjustments.
- Caveat: This is a basic calibration. Your TV's internal settings will offer much more granular control, which we'll get to next.
Mastering Your TV Settings for 4K Movies
Your TV is the final output device, and its settings often have the most significant impact on picture quality. This is where we turn a good image into a great one.
Important Pre-Step:
- Label Your HDMI Input: Go into your TV's input settings and label the HDMI port your Xbox is connected to something like "Xbox" or "Blu-ray Player." This can sometimes tell the TV to apply specific picture modes optimized for movies automatically.
- Turn on "Enhanced" HDMI Mode: On your TV, navigate to your HDMI input settings (often found in "General," "Inputs," or "External Devices"). For the HDMI port your Xbox is connected to, enable settings like "HDMI UHD Color," "Deep Color," "Enhanced Format," or "Full Pixel Range." This unlocks the full bandwidth for 4K, HDR, and wider color gamuts.
Picture Mode: Your First and Most Important Choice
Almost every TV has various "Picture Modes." This is where you begin.
- "Movie," "Cinema," or "Filmmaker Mode": These are almost always the most accurate picture modes. They aim to reproduce colors and contrast as intended by the director, typically with minimal processing. Start here.
- Avoid "Dynamic," "Vivid," or "Sports": These modes often over-saturate colors, boost brightness excessively, and introduce unnatural sharpness, making movies look artificial.
- "Standard" or "Normal": A decent starting point if "Movie" mode feels too dim initially, but usually still less accurate.
Key Picture Settings to Adjust
Once you've selected your "Movie" or "Cinema" picture mode, fine-tune these:
- Backlight / OLED Pixel Brightness:
- Purpose: Controls the overall light output of your screen.
- Recommendation: Set this based on your viewing environment. For a dark room, a lower setting is ideal to preserve black levels and reduce eye strain. In a brighter room, you'll need to increase it. For OLEDs, adjust "OLED Pixel Brightness." Don't automatically max it out.
- Contrast:
- Purpose: Controls the difference between the brightest whites and darkest blacks.
- Recommendation: Keep this close to its default in "Movie" mode. Use a calibration pattern (easily found on YouTube or dedicated calibration discs) to set it so bright details are visible without clipping (washing out).
- Brightness:
- Purpose: Controls the dark areas of the picture.
- Recommendation: Again, use a calibration pattern. Adjust so dark details are visible without the blacks appearing gray (crushing). A common mistake is setting brightness too high, which lifts black levels.
- Sharpness:
- Purpose: Enhances edge detail.
- Recommendation: Set to 0 or its lowest possible setting. Modern 4K content doesn't need artificial sharpening; it adds halos and artifacts, making the image look unnatural. Your 4K signal is already incredibly sharp.
- Color / Saturation:
- Purpose: Controls the intensity of colors.
- Recommendation: Keep this close to default in "Movie" mode. Too high, and colors look cartoonish; too low, and they look washed out.
- Tint / Hue:
- Purpose: Adjusts the balance between green and magenta.
- Recommendation: Leave at default (usually 50/50). This should only be adjusted with proper calibration tools.
Advanced Picture Settings: What to Enable and What to Disable
Many TVs have an array of "enhancement" features. For movies, most of these should be off.
- Motion Interpolation / Motion Smoothing (e.g., "MotionFlow," "TruMotion," "Auto Motion Plus"):
- Recommendation: TURN OFF. This creates the infamous "soap opera effect" by generating artificial frames to smooth motion. While some like it for sports, it destroys the cinematic look of films, which are meant to be seen at 24 frames per second.
- Noise Reduction (e.g., "MPEG Noise Reduction," "Digital Clean View"):
- Recommendation: OFF or Low. Modern 4K Blu-rays and high-quality streaming rarely have noise that needs fixing. These features can soften the image and remove fine detail.
- Dynamic Contrast / Contrast Enhancer:
- Recommendation: OFF. These features dynamically adjust contrast on a scene-by-scene basis. While they can make an image "pop," they often crush blacks, clip whites, and alter the director's intended look.
- Local Dimming (for LED/QLED TVs) / Dynamic Tone Mapping (for HDR):
- Recommendation: High or Medium (for Local Dimming), ON (for Dynamic Tone Mapping).
- Local Dimming helps improve black levels and contrast on LED TVs by dimming specific zones of the backlight.
- Dynamic Tone Mapping (separate from Dynamic Contrast) is beneficial for HDR, especially when playing HDR10 content on a TV that also supports Dolby Vision. It helps the TV optimize the HDR signal for its specific panel capabilities.
- Gamma:
- Recommendation: Typically 2.2 or 2.4. Gamma affects the overall lightness or darkness of mid-tones. For a dark room, 2.4 is often preferred for deeper shadows. For brighter rooms, 2.2 might be better. Experiment carefully.
HDR/Dolby Vision Specific TV Settings
When HDR content plays, your TV often switches to a separate set of picture settings. Double-check these:
- HDR/Dolby Vision Picture Mode: Ensure it's still set to "Movie" or "Cinema" (some TVs have specific "HDR Movie" modes).
- Brightness/Backlight: HDR is designed to be bright, but don't automatically max this. Aim for a setting that provides dazzling highlights without causing eye strain.
- Contrast: Often defaults to max in HDR modes; this is generally appropriate for HDR to achieve peak luminance.
Bringing It All Together: Troubleshooting & Best Practices
Even with all settings dialed in, sometimes things don't look quite right.
Common Issues and Quick Fixes
- Washed-Out Colors in 4K/HDR:
- Cause: Often, your TV's "Enhanced HDMI" mode isn't enabled for that port, or your Xbox color depth/color space is mismatched.
- Fix: Ensure "HDMI UHD Color" (or similar) is ON for the Xbox's HDMI port on your TV. Verify Xbox's color depth is 10-bit and color space is "Standard."
- No 4K/HDR Signal:
- Cause: Bad HDMI cable, TV not set to the correct input, or TV's "Enhanced HDMI" mode is off.
- Fix: Try a different HDMI cable. Check your TV's input selection. Ensure "Enhanced HDMI" is on. Check "4K TV details" on Xbox.
- Motion Judder/Stutter:
- Cause: TV's motion smoothing is off, but the TV isn't correctly handling 24p content.
- Fix: Ensure "Allow 24Hz" is enabled on your Xbox. Sometimes, disabling motion smoothing entirely is better than any "Movie" mode specific motion options.
The Power of Experimentation (With Caution)
While these guidelines provide a strong foundation, every TV and viewing environment is unique. Don't be afraid to experiment, but do so methodically:
- Change one setting at a time. See the effect.
- Use reference material. Watch a high-quality 4K Blu-ray or a known good 4K HDR stream (like Our Planet on Netflix, Blade Runner 2049, or Mad Max: Fury Road).
- Trust your eyes, but with an educated perspective. If something looks unnatural (too bright, too dark, colors are off), it probably is.
Beyond the Picture: Enhancing Your 4K Movie Sound
While our focus is visual, a great picture is only half the immersive experience. Your Xbox is also a formidable audio machine.
- Audio Output Settings (Xbox):
- Speaker audio: Set to "HDMI audio"
- HDMI audio:
- Dolby Atmos for home theater: If your sound system supports it (e.g., soundbar or AV receiver). This provides incredible spatial audio.
- DTS:X for home theater: Another excellent object-based audio format if your system supports it.
- Dolby Digital or DTS: Standard surround sound formats, excellent for most setups.
- Stereo uncompressed: Use this if you're connecting directly to a TV with only stereo speakers.
- Passthrough: If you're using an AV receiver, ensure your Xbox is set to pass through the raw audio bitstream. This lets your receiver decode the high-quality audio formats.
By ensuring your Xbox is sending the highest quality audio signal to your sound system, you'll complete the cinematic transformation of your home theater.
Common Questions and Misconceptions
"Should I use my TV's built-in apps or the Xbox for streaming 4K movies?"
Generally, the Xbox is excellent for streaming. Its powerful processor and consistent software updates mean it handles 4K HDR streams very well. However, some TV's native apps might have slightly better integration with their specific HDR formats (like proprietary Dolby Vision implementations). Test both! If you find one looks better or runs smoother, stick with it. The Xbox usually offers a more consistent user experience across all apps.
"My Xbox Series S upscales games, but does it play 4K movies natively?"
Yes, the Xbox Series S plays 4K movies natively, both from streaming services and 4K Blu-ray discs (if you have an external USB 4K Blu-ray drive, as the Series S lacks an internal one). Its video output is true 4K for media content.
"Is HDR always better than SDR?"
For content mastered in HDR, absolutely. HDR offers a wider range of colors, brighter highlights, and deeper shadows, creating a much more lifelike and impactful image. However, forcing SDR content into an HDR mode can sometimes lead to an unnatural or over-processed look. Always ensure your TV is correctly detecting and switching to HDR only when playing actual HDR content.
"Should I enable Game Mode on my TV for movies?"
No. Game Mode bypasses most of your TV's image processing to reduce input lag, which is vital for gaming. For movies, you want that image processing (like proper color mapping and local dimming) to be active. Stick to "Movie" or "Cinema" mode for the best picture quality.
Your Home Theater Awaits
Optimizing your Xbox and TV settings for 4K movie playback isn't about getting bogged down in technical minutiae; it's about unlocking the full potential of your existing hardware. By systematically going through these settings, you'll transition from merely watching movies to truly experiencing them.
Enjoy the richer colors, deeper blacks, dazzling highlights, and the pure cinematic magic that a properly configured 4K setup can deliver. Grab some popcorn, dim the lights, and prepare for movie night like never before.